Introduction
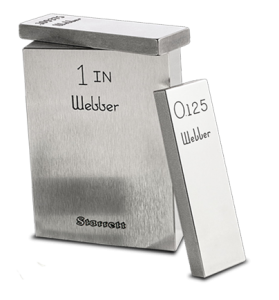
Gage blocks, also known as gauge blocks, are precision tools used in metrology for calibrating and measuring dimensional tools. To maintain their accuracy, it’s essential to understand the process of wringing gage blocks correctly. Wringing involves joining two or more gage blocks together to form a precise length. This guide will walk you through the step-by-step process of wringing gage blocks to ensure optimal performance and measurement accuracy.
What is Wringing?
Wringing is the process of sliding two gage blocks together so that they adhere tightly without any external adhesive. This phenomenon occurs due to a combination of molecular attraction, surface tension from a thin oil film, and air pressure. When properly wrung, gage blocks can form an airtight and nearly invisible bond.
Why Wring Gage Blocks?
Properly wrung gage blocks are crucial for:
- Accuracy: Wringing ensures that the blocks are aligned perfectly, which is essential for maintaining the highest precision in measurements.
- Stability: A wrung set of blocks remains stable, reducing the chances of movement during measurements.
- Efficiency: Wringing multiple blocks together allows for the creation of various standard lengths without needing a vast number of individual blocks.
Step-by-Step Guide to Wringing Gage Blocks
1- Clean the Gage Blocks
- Before wringing, thoroughly clean the gage blocks with a lint-free cloth and a suitable cleaning solvent, such as alcohol or a specialized gage block cleaner. This step is crucial as any dust, oil, or debris can affect the wringing process and measurement accuracy.
2- Inspect the Blocks
- Check the gage blocks for any visible damage, nicks, or scratches. Damaged blocks should not be used, as they can compromise the accuracy and longevity of your gage block set.
3- Apply a Thin Film of Oil
- Apply a very light coat of high-quality gage block oil to the blocks. The oil helps in the wringing process by creating a thin film that aids in molecular attraction.
4- Align the Blocks
- Place the blocks on a flat, clean surface. Position them at a slight angle to each other with one block slightly overlapping the other.
5- Slide and Rotate
- With light pressure, slide one block onto the other while gently rotating it. The goal is to expel any trapped air between the surfaces. As you slide, you’ll feel the blocks begin to adhere.
6- Ensure Proper Wringing
- Once the blocks are wrung, they should feel securely bonded with no visible gap between them. A properly wrung set will resist separation without significant force. To test this, try gently lifting the top block – the bottom block should remain attached.
7- Store Correctly
- After wringing, store the gage blocks in a clean, dry environment to prevent contamination or damage. If you need to separate the blocks, slide them apart rather than pulling them directly to avoid damaging the surfaces.
Common Mistakes to Avoid
- Over-Oiling: Too much oil can prevent the blocks from adhering properly. Use only a minimal amount.
- Using Dirty Blocks: Always clean the blocks thoroughly to avoid scratching the surfaces, which can impact accuracy.
- Improper Handling: Handle gage blocks with care to maintain their precision surfaces. Avoid touching them with bare hands to prevent oil and dirt transfer.
Bottom Line
Wringing gage blocks is a straightforward but vital process in precision measurement. By following these steps, you can ensure your gage blocks are correctly wrung, providing accurate and reliable measurements for all your metrology needs. Remember, proper care and handling of gage blocks will extend their life and maintain their accuracy.


