Determining Instrument Calibration Protocols
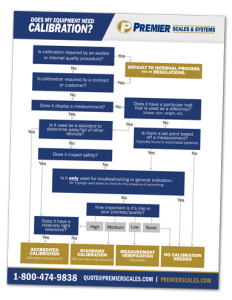
For those outsides of the metrology industry, selecting a calibration procedure may seem like a daunting task. To help navigate these murky waters, we have put together a quick guide for selecting the correct calibration procedures for your equipment. Although there is no one size fit’s all solution, this guide will help you through the decision-making process.
1. Check for Existing Procedures or Regulations
When determining if equipment requires calibration, your first step should be checking for any existing procedures, customer contracts, or regulations that define maintenance guidelines. These preexisting quality procedures should serve as the minimum standard for your equipment’s calibration needs. If no procedures exist or you are working to define those procedures, continue to our steps below.
Want a Quick Reference?
2. Determine if a Measurements is Made/Used
Since all measurement equipment drifts over time, the general rule of thumb is if it measures it needs calibration. Identifying measurement equipment may sound easy, but not all equipment uses measurements in the same way. In addition to devices that take measurements such as calipers, multimeters, and scales there is also equipment like gauge blocks, thread gauges, and check weights that use innate traits as a measurement reference. Another commonly overlooked use of measurement occurs in automated processes. Many automated processes and safety equipment use preset values called set points to trigger a particular action. When this happens, a person may never actually see a measurement occur, but it is still happening in the background.
It is important to note, there is one exception to the all measuring equipment should be calibrated rule. If the equipment is solely used for troubleshooting or to indicate the presence of something, they may not need calibration. Such equipment could include pressure gauges used to indicate whether a vessel is pressurized or multimeters solely used to check for the presence of electricity. Although calibration is not needed, you should still check this equipment for general functionality.
3. Determining the Level of Calibration
As we’ve discussed in a previous article, not all calibrations are the same. If you’re looking for the highest level of quality, performing an exhaustive calibration may seem like the best course of action. However, depending on the equipment’s role, the effect on quality, and process tolerances, this could be overkill.
Accredited Calibration – You should reserve this level of calibration for equipment with a direct impact on safety, quality, or other calibrations. Examples include facility standards, safety equipment, and in-process equipment with tight measuring requirements. Fully accredited calibrations will use as much data possible, including measurement uncertainty, to determine whether equipment passes or fails a calibration. Since measurement uncertainty can generate “not possible” results, we recommend avoiding this level for non-critical equipment.
Standard Calibration- For most in-process equipment, we recommend standard calibration. Standard calibrations are usually considered ISO/IEC 17025 accredited but do not directly factor measurement uncertainty into pass/fail results.
Measurement Verification (Traceable) – Typically performed on low-impact equipment, measurement Verifications are simply a traceable comparison of two pieces of measuring equipment. Although these are the lowest form of calibration, they still have their place. Since they require less rigorous procedures, verifications are typically faster and cheaper to perform. For applications where a general reference point is more important than the actual numbers, verifications are the perfect solution.
Need Help Identifying Equipment for Calibration?
Our team is here to help with the Tool Roundup Program. By partnering with our team, you are ensuring the highest level of calibration management for all of your equipment.


