How do Precision, Trueness, & Accuracy impact your business?
In our line of business, we frequently throw around the terms precision, trueness, and accuracy. Often these terms are casually tossed out without explanation, which creates plenty of questions and misconceptions around each term. What makes a scale considered high precision? What does it mean when your pressure gauge is true to a known value? How do these terms impact your business? First, let’s take a look at what each of these terms means, and how they compare to each other.
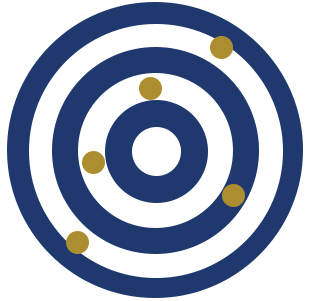
Target 1
High Trueness
Low Precision
Low Accuracy
Defining the Terms
Trueness:
Trueness is defined by systematic errors within a group of measurements. In more simplistic terms, the more “true” a device, the closer the average of its measurements are to a known value or standard. Since trueness is based on systematic errors, a device can be considered true without a single correct measurement. All you need is the correct average. For example, if you measure a known 10kg weight five times with the results 2kg, 6kg,13kg, 13kg, and 16kg, the device’s average is still considered true even though none of your results are even close to 10kg (Target 1).
Apply this to a particular data point in your business. Although the variations may not be so drastic, it is not uncommon for values to swing wildly from measurement to measurement even if the average seems on target. What are the repercussions of a +/-5% swing in your industry? In the food industry, a swing in temperature readings could mean sporadically undercooked/unsafe products or an overcooked quality issue.
Note: Traditionally this is the definition for Accuracy, but International Organization for Standardization (ISO) uses “trueness” instead of reserving “accuracy” to refer to the combination of trueness and precision.
Target 2
Low Trueness
High Precision
Low Accuracy
Precision:
The term precision is measured by the number of random errors in a sample set. High precision means that results from the repeated measurement of a known value will be relatively similar results under the same circumstances. When we use the term high precision in relation to a measuring device like a scale, we are referring to its ability to reproduce the same relatively small values multiple times under the same conditions without random errors. Some low-precision equipment may be able to display the same relatively small values, but different results will be displayed each time an object is weighed.
It is important to note, precision on its own is not enough. To be considered precise, a displayed value doesn’t necessarily need to be correct as long as it’s the same for each measurement. To follow our example from trueness, if you measure a 10kg weight five times with the results 15kg, 15kg, 15kg, 15kg, and 15kg, the device is considered precise, but it is far from true (Target 2). High-precision and low-trueness errors can have a massive effect on your business. Could you afford to give away and an extra 5% of product from overfilling orders every day? How long will your equipment last if it’s consistently working 5% faster than it’s intended design?
Target 3
High Trueness
High Precision
High Accuracy
Accuracy:
Finally, accuracy is a combination of trueness and precision. High-accuracy equipment produces the same true to the known value result for each measurement. This is the only time in our example that the 10kg weight measures 10kg for each of the five measurements (Target 3). The more “accurate” a measurement device is the less uncertainty there is in any individual measurement. Accuracy is the universal goal that ensures everyone is measuring the same kg, meter, and second across the world. On a more local and individual level, accurate data is the driving force behind efficiency, profitability, and growth. Inaccurate data can have a wide-spread impact on your quality, safety, and the bottom line.
Obtaining Accuracy
1. Identify Your Goals:
The first step should always be identifying your accuracy goals. Unfortunately, obtaining 100% accuracy is an unachievable goal. Even the most advanced labs and facilities have their limits. Think critically about your facility’s needs and limitations; decide the acceptable variances for your procedures. In the metrology world, this variance is called an acceptable tolerance. For some procedures, being +/-1% is completely acceptable. For others, like the pharmaceutical industry, +/-1% could be catastrophic.
2. Use the Right Equipment for the Job:
Once you have set goals, determine if your equipment is able to meet those standards. If your recipe requires ingredients to be within +/-2 milligrams of the desired amount, make sure you have a scale that can precisely read up to three decimal places without fluctuation. If you’re not sure where to start or stuck on a particular process, Premier can provide a free consultation to identify which pieces of equipment need to be examined and help determine acceptable tolerances for each of your processes.
3. Create a Procedure:
When equipment is performing to acceptable standards, it’s time to create a procedure. Variables such as timing, sample positioning, and the environment can distort measured values. Procedures should be designed around standardizing work and reducing the number of outside variables. If done correctly, this can dramatically increase your process’s precision. This is the very reason Premier holds an ISO/IEC 17025 accreditation. Our ISO/IEC 17025 standards ensure we follow a rigorous procedure and conduct each instrument calibration with the fewest number of outside variables.
4. Regular Instrument Calibration / Practice Preventative Maintenance:
As we discussed in our blog post on Preventative Maintenance can drastically reduce the number of breakdowns and extend the life of your equipment. One important facet of preventative maintenance for measuring equipment is calibration. Instrument calibrations are the only way to confirm your measuring equipment has remained true to a known value. Over time and regular use, all measuring equipment will lose its trueness. Often the change is slow and, for an extended period of time can go relatively unnoticed. Unfortunately, by the time these changes are large enough to notice the equipment has been out of the accepted tolerance for far too long. This is the number one reason we recommend you set a regular instrument calibration cycle for everything piece of measuring equipment.
How Premier Can Help?
Over our last 50 years, we have helped hundreds of companies design, implement, and manage custom calibration and preventive maintenance plans. Our skilled team will help your facility identify equipment that needs calibration, determine the appropriate tolerances, and set custom calibration windows designed around each piece of equipment use and function. Since Premier has one of the area’s largest ISO/IEC 17025 accredited instrument calibration scopes, a partnership with us means you are ensuring the highest level of calibration management for all of your equipment under one plan. Request a consultation below, and learn how we can bring accuracy to your facility.
