Chasing 100% Accuracy
In the world of metrology, there is no way to achieve 100% accuracy. It is only a goal. For every measurement, even the most careful and precise, there is always a margin of doubt or uncertainty. Measurement Uncertainty is the quantification of that doubt. In everyday speech, we use the expression, “give or take” to represent this uncertainty. For example, someone may say, “this part weighs two pounds give or take an ounce.”
The sources of uncertainty in measurements could be anything from environmental factors such as wind, vibration, and temperature to device factors such as rounding, repeatability, resolution, and linearity. Other factors could include tolerance of the calibration standard, the quality of the calibration process, or the quality and performance of the measurement device.
What does uncertainty look like in practice?
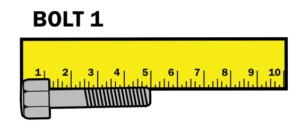
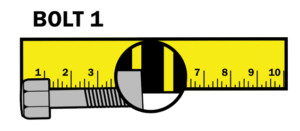
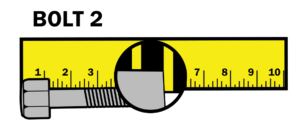
Let’s look at a simple measuring example. Assume you measure two bolts on a ruler. Each bolt lands right on the 5 cm line, so 5 cm is considered their measured value. Now, zooming in you notice each bolt hits a different section of that line. The first bolt stops at the beginning of the 5 cm line, and the second bolt stops at the end. Which bolt has a true length of 5 cm? Unfortunately, there is no way to know the absolute true measurement. Each measuring device and the factors we listed earlier introduces uncertainty. In this example, the thickness of the line itself has caused uncertainty. Depending on the thickness of that line, there is more or less uncertainty on which bolt is actually 5 cm.

Why does this matter?
It is crucial to consider the measurement uncertainty of your process. Even after minimizing uncertainty, it plays a major factor in your process. If our bolt from earlier must measure between 4.8 cm to 5.2 cm, you may assume a tolerance of +/- 0.2 cm will work. However, assuming the ruler’s uncertainty is 0.1 cm, that tolerance will produce unusable bolts. The bolt could measure anywhere from 4.7 cm to 5.3 cm. When we factor in the 0.1 cm uncertainty, the correct tolerance should be +/-0.1 cm.
How Uncertainty Affects Your Calibration
Since uncertainty represents doubt and our confidence level of a measured value being the true value, it can determine the results of your calibration. Below we have a chart of hypothetical measured values and how they are interpreted.
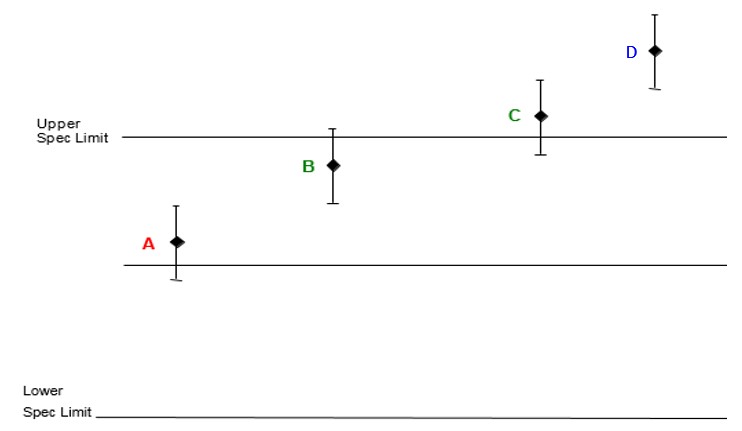
(Case A) In Compliance: If the measurement result plus the calculated measurement uncertainty is within the specification limit, then compliance with the specification can be stated. This is reported as “In Compliance” (in tolerance).
(Case B & C) Not Possible: If the measurement result plus/minus the calculated measurement uncertainty overlaps the limit, it is not possible to state compliance or non-compliance. The measurement result combined with the calculated measurement uncertainty is reported as Within Uncertainty Not Possible.
(Case D) Out of Tolerance: If the measurement result minus the calculated measurement uncertainty is outside of the upper specification limit, then non-compliance with the specification can be stated. This is reported as “High” (out of tolerance on the High side). If the measurement result combined with the calculated uncertainty is outside of the lower specification limit, then this is reported as “Low” (out of tolerance on the Low side).
How Premier Can Help
We promise to provide the most accurate calibrations possible. At Premier Scales & Systems, our ISO/IEC 17025 accredited calibration and state-of-the-art calibration laboratory takes steps to add confidence to the accuracy of your measurement devices by minimizing measurement uncertainty.

