The Hidden Paper Trail that Makes The Global Supply Chains Possible
Among many other things, the last year has shown us just how fragile our global supply chain truly is. From semiconductors to paper goods, broken supply chains are causing new shortages just about every day. These hiccups have brought to light the amazing interconnectivity of our global supply chain. Unexpectedly closing a small bolt-producing factory in Kentucky can halt production halfway around the world in Japan that, in turn, stops the assembly of a machine in Mexico.
Have you ever wondered how all of that is even possible in the first place? Even though no one expressly designed the pieces for each other, they somehow fit together seamlessly. The precision required to combine elements from across the world into a single product is an astounding feat. So how is this seemingly magical achievement possible? The answer is a system of little paper trails that most people don’t even know exists called measurement traceability.
Untraceable Calibration is not enough
For those who haven’t read our earlier article on the subject of calibration, it is the process of comparing a measurement or value produced by an instrument to a known standard. Since a Kentucky standard would likely be dramatically different from the one used in Japan, the initial comparison alone is not enough to accomplish the universal alignment required to fit our bolt from earlier into the Japanese part. The only assurance we can make is that the bolt will fit into other devices calibrated by our standard.

How Traceability Works
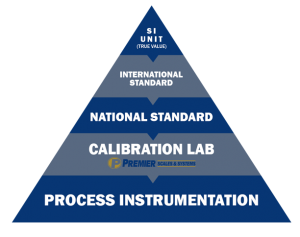
This is the part where traceability comes into play. If you’ve ever seen a calibration certificate, you may have noticed a section containing traceability numbers on your certificate. Calibration labs like Premier Scales & Systems use these numbers to link an equipment’s measurements to the standard(s) used during calibration. That standard has its own certificate with a similar number connecting it to a series of progressively more controlled standards. Depending on the value measured, these numbers create a paper trail connecting equipment to one of seven international standard units (SI). Since these units are considered the single universal standard or true value for all measurements, each step up the chain has increasingly tighter tolerances and less measurement uncertainty. This traceability chain is the link ensuring our Kentucky M8 bolt fits any M8 hole produced at a quality-controlled facility.
How We Can Help
Our ISO/IEC17025 accredited lab provides traceable calibrations for virtually any piece of measuring equipment. Our extensive capabilities mean one company, one point of contact, and one invoice for any metrology need. This streamlined approach reduces time, paperwork, and ultimately cost. To learn more about how we can help your company, request a quote below.


