 Defining Drift
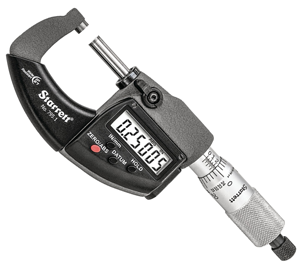
Drift is a measurement error caused by the gradual shift in a gauge’s measured values over time. Although incorrect handling can accelerate it, nearly all measuring instruments will experience drift during their lifetime. If left unchecked, this shift can cause extensive measuring errors, safety hazards, and quality issues. In this article, we will examine the primary types of drift, and highlight a few tips for mitigating their risk.
Types of Drift
In the metrology world, there are three primary types of instrument drift. No, we aren’t talking about giant fluffy snowdrifts, adrenaline-pumping drifts on a race track, and gently drifting down a stream. We are talking about the exhilarating metrology terms Zero Drift, Span Drift, and Zonal Drift.
No Drift
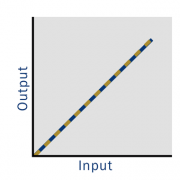
First, let’s establish what it looks like to have no drift. No drift is present when the measured value is equal to the calibrated value.
Zero Drift
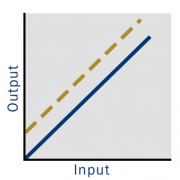
Zero or Offset Drift is a consistent shift across all measured values. As the name implies, a change in the zero value is responsible for this type of drift to occur.
Span Drift
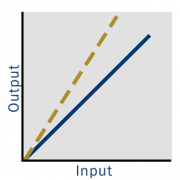
Span or Sensitivity Drift is a proportional increasing or decreasing shift of the measured value away from the calibrated values as the measured value increases or decreases.
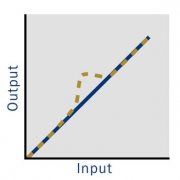
Zonal Drift
Zonal Drift occurs when only a particular span of measured values is shifted away from the calibrated values. All other measured values remain unaffected.
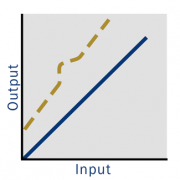
Combined Drift
It’s not uncommon to have multiple drifts present at once. This is often referred to as Combined Drift.
What Causes Drift
Depending on your instrument, there are a variety of factors that can cause drift.
- Time
- Sudden Shock
- Environmental Changes
- Vibrations
- Normal Wear and Tear
- Improper use
- Debris Buildup
- Electromagnetic Fields
Drift Durations
Before learning to manage drift, it is essential to determine the natural duration of your particular drift. These durations will help you determine the actions needed to return measurements to the correct values.
Short-term drift is a temporary effect on measured values caused by flexible factors such as thermal expansion, environmental interference, and vibrations. Once removed from its environment or allow to rest, the gauge’s measured values will revert towards the calibrated values.
Long-term drift is typically caused by regular wear and tear or other naturally occurring damage. Long-term drift typically requires an adjustment to return measurements to the correct values. Since long-term drift typically develops at a consistent rate, it can be predicted and corrected before instruments move outside of tolerance.
How to Manage Drift
Even though drift is unavoidable, proper care and maintenance is the best method of minimizing its development. Below we highlight our top seven tips for mitigating the risk of drift.
-
Use equipment only for its intended purpose.
If it’s not a prescribed use for a piece of equipment, don’t do it. Over the years, we’ve seen everything from employees eating lunch on a surface plate to someone using calipers to pry open a container. Precision instruments are designed to fulfill a specific purpose, and any use outside of that purpose can completely ruin its functionality.
-
Use equipment only within its approved ranges.
This issue is particularly common for scales and other equipment without a hard physical stop. Overloading, overextended, or even running equipment close to its limits, will cause drift to develop quicker or damage equipment.
-
Treat your equipment like glass.
Despite the rugged environment where many gauges exist, they are delicate equipment. Drops, bumps, and other sudden shocks can alter equipment’s ability to measure.
-
Keep equipment in stable environmental conditions.
Environmental changes can cause equipment to expand and contract. These subtle changes can slowly push equipment away from its calibrated value.
-
Use In-House References
Since it develops gradually, drift can grow for extended periods before it is noticed. One way to defend against this slow creep is through the use of in-house references. These references allow your team to quickly identify drift by periodically checking the equipment’s measurements against the reference’s known value. These values can then be tracked on a control chart to identify trends and potential causes.
-
Establish a Control Chart
Control charts provide valuable insight into your equipment and process performance. The interpretation of these charts could be its own article, but their data can help you identify procedural issues, tool wearing trends, operator error, and sudden damage.
-
Practice regular preventative maintenance.
Even under ideal conditions, regular use will cause equipment to drift over time. The only full-proof method for keeping drift in check is through routine preventive maintenance practices like cleaning, lubrication, calibration, and adjustments.
How We Can Help
If you are tired of juggling different calibration companies for each piece of equipment, we can simplify your experience. Our comprehensive ISO/IEC17025 accredited calibration scope is ready to keep drift at bay for virtually any piece of measuring equipment. Our extensive capabilities mean one company, one point of contact, and one invoice for any metrology need. This streamlined approach reduces time, paperwork, and ultimately cost. To learn more about how we can help your company, request a consultation below.
